
Prepping for Prosthetic Makeup Application

- Cleanse the area where the prosthetic will be applied with a residue-free cleanser and pat dry.
- Use a cotton ball with witch hazel to remove any excess dirt, oil, or makeup.
- Place the prosthetic on the desired area to check fitting and make adjustments if needed.
- Pro-Tip: Tear away excess material for easier blending.
Quick Shop M. Cramer Products: Ben Nye Remove-It All
Apply the Prosthetic Makeup

1. Apply a small amount of Prosthetic Adhesive to the center of the prosthetic (avoiding the edges) with a cotton swab. Let it dry slightly.
2. Apply Prosthetic Adhesive to your skin where the prosthetic will be placed.
3. When the adhesive turns translucent, carefully apply the prosthetic, pressing down firmly.
4. Apply a light layer of adhesive to the edges of the prosthetic and your skin, press down, and repeat for a seamless blend.
Quick Shop M. Cramer Products: Ben Nye Prosthetic Adhesive, Ben Nye Spirit Gum Adhesive
Blending the Edges of the Prosthetic Makeup

1. Apply a thin layer of Prosthetic Adhesive to the seam between your skin and the prosthetic using a wedge sponge or q-tip (in thin layers).
2. Repeat 3-4 times or more for thicker prosthetic edges, allowing each layer to dry completely.
Quick Shop M. Cramer Products: Ben Nye Prosthetic Adhesive, Ben Nye Spirit Gum Adhesive
Sealing Your Prosthetic

1. Apply a thin layer of Prosthetic Adhesive over the entire prosthetic with a sponge and let it dry.
2. Apply translucent powder to remove tackiness and shine from the adhesive.
Quick Shop M. Cramer Products: Ben Nye Prosthetic Adhesive, Ben Nye Spirit Gum Adhesive, Ben Nye Translucent Powder
Painting Your Prosthetic
1. Apply a Base Coat
- Apply Liquid Latex to blend the edges of the prosthetic to your skin.
- Use Castor Sealer over the dried latex to create a suitable surface for makeup.
Quick Shop M. Cramer Products: Ben Nye Clear Liquid Latex, Ben Nye Castor Sealer
2. Choose your Colors
- FX Creme Colors or Alcohol-Activated Colors are both suitable for coloring prosthetics.
Quick Shop M. Cramer Products: Ben Nye Ultimate F/X Creme Colors, Ben Nye Alcohol-Activated Colors
3. Apply And Blend The Colors
- Apply FX Creme Colors over the prosthetic and blend them into your skin using a brush with isopropyl alcohol.
- Alternatively, use Alcohol-Activated Colors for waterproof and realistic effects. Build up the pigments in thin layers for desired opacity.
Quick Shop M. Cramer Products: Ben Nye Ultimate F/X Creme Colors, Ben Nye Alcohol-Activated Colors
4. Create Texture With Brushwork
- Use different brush techniques to achieve varying textures on the prosthetic wound.
- Stippling with a fine detailed brush creates a textured base.
- Spattering and flicking the paint with the brush adds a natural look.
- Apply direct brushstrokes or dry brushing for additional definition.
Quick Shop M. Cramer Products: Fine Detail Brush, Angle Shadow Brush, Dome Eye Shadow Brush, Custom Round Brush
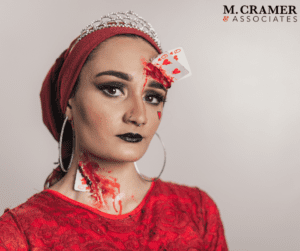
5. Add Blood For Extra Gore (Optional)
- Use simulated blood products like Fresh Scab or Thick Blood for longer-lasting effects.
- Apply the blood with a spatula or applicator tool.
Quick Shop M. Cramer Products: Ben Nye Fresh Scab, Coagulated Blood Gel, Ben Nye Thick Blood, Complete Blood Pack